What Is The Difference Between Cut Knurling vs. Form Knurling?

Confused about knurling? Choosing incorrectly impacts your parts. This guide clarifies cut versus form knurling, ensuring you pick the right method for optimal results.
Cut knurling removes material to create patterns, reducing the workpiece diameter slightly. Form knurling, on the other hand, displaces material by pressing a tool into the surface, generally maintaining or slightly increasing the diameter.
Understanding these key differences is crucial for your CNC machining projects, especially when you're looking for quality parts like many of my customers, such as Mark Chen from Canada. He always emphasizes the importance of getting the details right from the start. Let's explore further to ensure you make informed decisions and achieve the best outcomes for your parts.
What Is The Key Difference Between Cut Knurling And Form Knurling?
Unsure which knurling method suits your material? This uncertainty can lead to suboptimal part features. We'll break down their core distinctions for you now.
Cut knurling physically carves away material, making it ideal for harder materials and resulting in sharp, clean patterns. Form knurling displaces material, better for softer materials, producing a raised pattern by pressing into the workpiece.
When we talk about cut knurling at Worthy Hardware, we explain it as a process where material is actually removed from the workpiece. Think of it like miniature chisels shaving off bits to create the desired pattern. This method is often preferred for harder materials because it's less stressful on the machine and the tool compared to trying to press a pattern into something very tough. A big advantage I always highlight is that cut knurling generally produces a cleaner, sharper pattern. Also, since material is removed, the final diameter of the knurled section will be slightly smaller than the original diameter. This is a critical detail for precision parts.
Form knurling is quite different. Instead of cutting, the tool presses into the material with significant force. This pressure displaces the material, pushing it up to form the ridges of the knurl. Because no material is removed, the overall diameter of the part might increase slightly, or stay very close to the original. Form knurling works exceptionally well on softer, more malleable materials like aluminum or brass. It's often faster than cut knurling.
However, it does put more stress on the machine's spindle bearings and the workpiece itself. The resulting pattern might not be as crisp as cut knurling, and tool wear can be higher if used on very hard materials. I often tell my clients, like Mark, that understanding this material interaction is key to choosing the right process for cost-effectiveness and quality.
What Are The Three Main Types Of Knurling Patterns You Should Know?
Need a specific grip or look? Not knowing knurling types limits your design options. Let's explore the common patterns to enhance your components effectively.
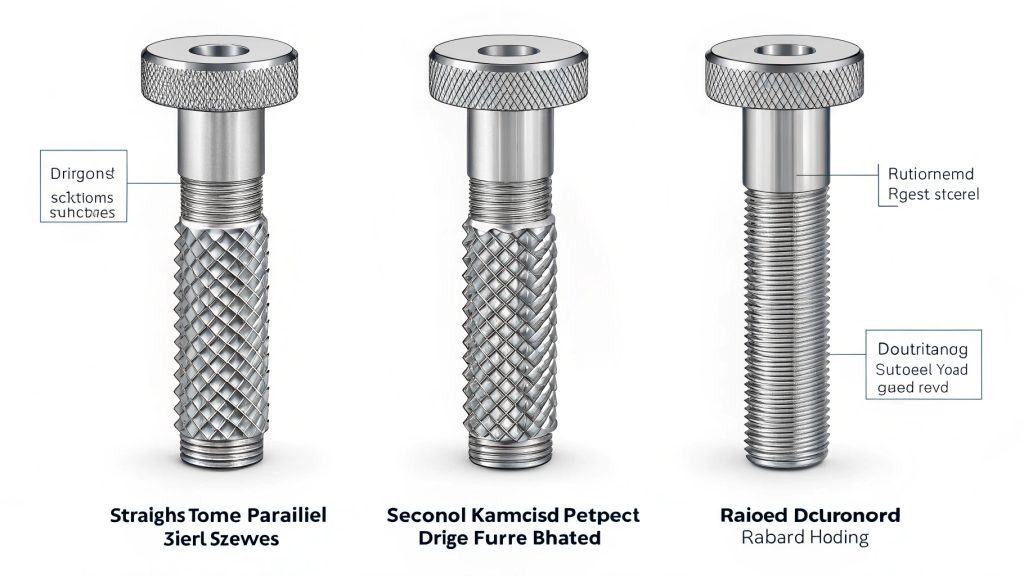
The three main knurling patterns commonly produced are straight, diamond (which includes angled or rhombic patterns), and helical. Each offers distinct grip characteristics and visual appeal for various applications.
The choice between straight and diamond knurling really comes down to how the part will be used. I always ask my clients, "What kind of grip do you need?"
Straight knurling is simpler. It creates parallel ridges. This pattern is effective if the primary force is along the length of the knurl, or if you need to resist rotation around the part's axis, like on a control knob you turn. It gives a clean, less aggressive look. One small advantage I've noticed is that straight knurls can be a bit easier to clean if that's a concern.
Diamond knurling, with its crisscross pattern, offers a more positive and multi-directional grip. Think about a thumbscrew or a handle on a tool. You might be pushing, pulling, or twisting from various angles. The diamond pattern catches your skin better from all directions. This is why it's so popular for manual adjustment parts. While it provides superior grip, the sharper points of a diamond knurl can sometimes feel more aggressive to the touch, depending on the pitch and depth.
It can also, in some very specific engineering cases, introduce more stress concentration points than a straight knurl, but for most grip applications, this isn't a major factor. Aesthetically, many people find the diamond pattern more appealing or "industrial." At Worthy Hardware, we can produce both with high precision, so the decision usually rests on the functional grip requirement and the desired look.
Straight Knurling Or Diamond Knurling: Which Is Better For Your Application?
Choosing between straight and diamond knurling? The wrong choice affects grip and aesthetics. We'll compare them to help you decide for your specific needs.
Straight knurling provides good grip against axial or rotational forces along parallel lines. Diamond knurling offers a more secure, multi-directional grip due to its crisscross pattern, making it generally better for overall handling.
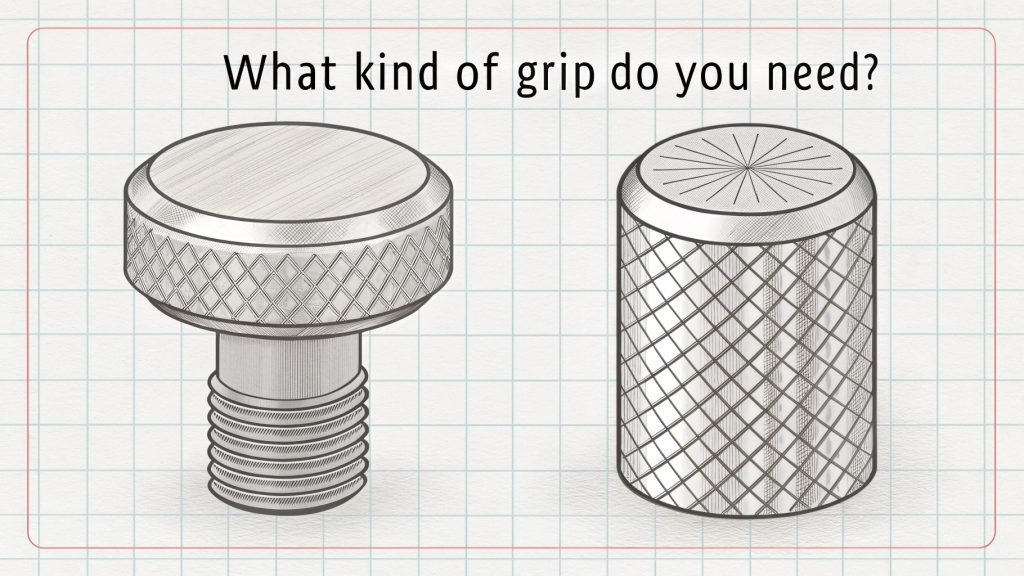
The choice between straight and diamond knurling really comes down to how the part will be used. I always ask my clients, "What kind of grip do you need?"
Straight knurling is simpler. It creates parallel ridges. This pattern is effective if the primary force is along the length of the knurl, or if you need to resist rotation around the part's axis, like on a control knob you turn. It gives a clean, less aggressive look. One small advantage I've noticed is that straight knurls can be a bit easier to clean if that's a concern.
Diamond knurling, with its crisscross pattern, offers a more positive and multi-directional grip. Think about a thumbscrew or a handle on a tool. You might be pushing, pulling, or twisting from various angles. The diamond pattern catches your skin better from all directions. This is why it's so popular for manual adjustment parts. While it provides superior grip, the sharper points of a diamond knurl can sometimes feel more aggressive to the touch, depending on the pitch and depth.
It can also, in some very specific engineering cases, introduce more stress concentration points than a straight knurl, but for most grip applications, this isn't a major factor. Aesthetically, many people find the diamond pattern more appealing or "industrial." At Worthy Hardware, we can produce both with high precision, so the decision usually rests on the functional grip requirement and the desired look.
What Is The Difference Between Knurling And Threading?
Confusing knurling with threading? This misunderstanding can lead to design errors. Let's clarify their distinct functions in component manufacturing for better part design.
Knurling creates a textured pattern on a surface primarily for grip or minor press-fit applications. Threading creates precise helical ridges designed for fastening components together or for controlled linear motion.
It's easy to see why some might get knurling and threading confused, as both involve creating patterns on a cylindrical surface. However, their purposes are very different. I often explain this to new engineers.
Knurling is all about creating a surface texture. The primary goal, as we've discussed, is to improve grip. Think of the handle on a dart or a control knob on a piece of equipment. The knurled pattern makes it easier to hold and manipulate. Sometimes, knurling is used to create a slight interference fit when one part is pressed into another, like a knurled pin into a hole. It can also be purely decorative. The pattern (straight, diamond) is important, but the precise dimensions of each individual ridge are not as critical as they are in threading.
Threading, on the other hand, is a highly precise process for creating a helical ridge—the thread—around a shaft (external thread, like a bolt) or inside a hole (internal thread, like a nut). The key purpose of threads is fastening. They are designed to mate with another corresponding thread to join parts together securely. Think of screws, bolts, and nuts. Threads can also be used to transmit motion, like in a lead screw of a machine.
Every aspect of a thread is critical: the pitch (distance between threads), the major and minor diameters, and the thread angle. These dimensions are standardized (like M6 or 1/4-20) to ensure parts from different sources can fit together. At Worthy Hardware, we use very different tools and techniques for knurling compared to threading, reflecting their distinct functions.
| Feature | Knurling | Threading |
|---|---|---|
| Primary Purpose | Enhance grip, aesthetics, minor press-fits | Fastening components, motion transmission |
| Geometry | Surface pattern (straight, diamond, etc.) | Helical ridge with defined pitch & profile |
| Mating | Generally does not mate with another feature | Designed to mate with a corresponding thread |
| Precision | Pattern uniformity important | Dimensional accuracy (pitch, diameter) critical |
Conclusion
Now you understand cut versus form knurling, common patterns, and knurling's difference from threading. Choose wisely for your projects with Worthy Hardware's expert support and services.