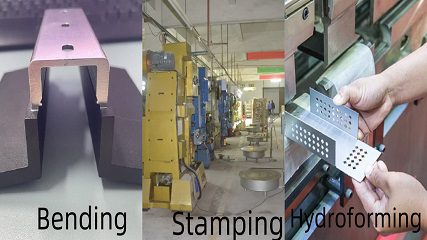
Bending vs. Stamping vs. Hydroforming: Which Sheet Metal Process Delivers The Best Results For Your Project?
Choosing the wrong sheet metal process can lead to budget overruns and project delays. You need the most efficient method for your specific part, but the options are confusing.
The best process depends entirely on your project's complexity, quantity, and cost targets. Bending is ideal for prototypes and low-volume runs due to its low setup cost. Stamping excels in high-volume production where per-unit cost is critical. Hydroforming is perfect for complex, single-piece shapes.
Navigating the world of sheet metal fabrication can feel overwhelming. You have a design, but turning it into a physical part requires choosing the right path. Each method—bending, stamping, and hydroforming—has unique strengths and is suited for different applications. Understanding these differences is the key to an efficient and successful production run. Let's break down each process so you can make an informed decision for your next project.
What is the difference between bending and stamping sheet metal?
Are you struggling to decide between bending and stamping for your parts? The high cost of a stamping die can be a shock, while manual bending might seem too slow.
The main difference lies in tooling and speed. Bending uses standard tools in a press brake for simple angles and is best for low volumes. Stamping uses custom-made dies to rapidly form parts, making it ideal for mass production where the high initial die cost is justified.
When we help clients at Worthy, the first questions we ask are about quantity and complexity. This usually points us directly to either bending or stamping. Bending is a highly flexible process. We can create multiple bends in a sheet of metal using a press brake with standard V-dies and punches. The setup is fast, and there are no custom tooling costs, which is why it's perfect for prototyping and small production runs. However, it's a slower, more labor-intensive process, so the cost per part doesn't decrease much with volume.
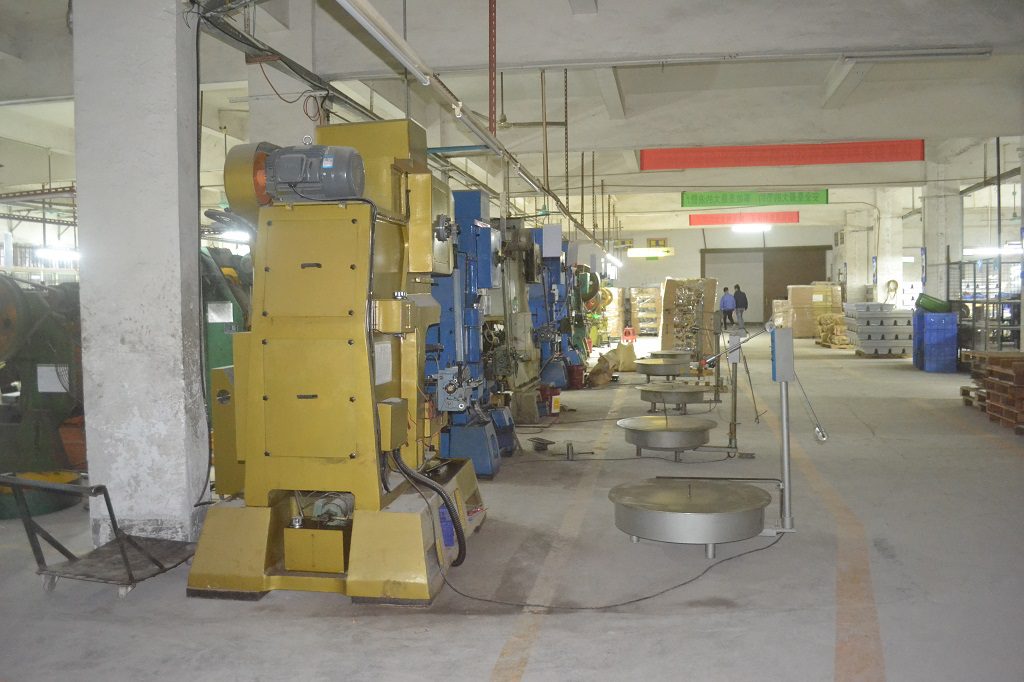
Stamping is the opposite. It's built for speed and volume. The process involves creating a dedicated tool and die set specific to your part. This initial investment is significant and can take weeks to produce. But once the die is ready, we can stamp out thousands of identical parts very quickly. The cost per part becomes extremely low at high volumes.
Here's a simple comparison:
| Feature | Bending | Stamping |
|---|---|---|
| Best For | Prototypes, Low Volume | High Volume, Mass Production |
| Tooling Cost | Low (uses standard tools) | High (requires custom dies) |
| Setup Time | Fast | Slow (die manufacturing) |
| Per-Part Cost | Higher, relatively stable | Very low at scale |
| Complexity | Best for linear bends/flanges | Can create complex forms/features |
Ultimately, if you need 50 brackets, bending is the only logical choice. If you need 50,000, stamping will deliver a much lower total project cost despite the initial die investment.
What is the difference between stamping and hydroforming?
Your part design is complex, maybe with deep curves or unusual shapes. Traditional stamping might cause the material to tear or thin out, but you're not sure what the alternative is.
Stamping uses two rigid, matched metal dies to press a sheet into shape. Hydroforming uses one rigid die and high-pressure fluid on the other side. This fluid pressure allows the metal to flow more evenly into complex shapes without tearing or excessive thinning.
While both stamping and hydroforming shape metal, they do it in fundamentally different ways. The "punch and die" method of stamping is very effective for many shapes, but it has limitations. Because a solid metal punch is forcing the material into the die, you can get uneven material thickness, especially in deep-drawn parts. The corners can become very thin and weak.
Hydroforming solves this problem. We place a sheet metal blank on a single die half. Then, a chamber is sealed over it, and we pump in hydraulic fluid at extremely high pressures. This pressure acts like a universal punch, pushing the metal down and forcing it to conform perfectly to the shape of the die. Because the pressure is uniform, the material flows smoothly and maintains a much more consistent thickness, even in very complex or deep shapes. This results in a stronger, higher-quality final part. The process also reduces the need for multiple stamping operations, sometimes combining several steps into one. This can save on tooling costs and assembly time for the right kind of part.
What is the difference between bending and forming sheet metal?
You hear the terms "bending" and "forming" used, and they seem interchangeable. This confusion can make it hard to accurately describe your needs to a fabricator like us.
"Forming" is the broad category for any process that shapes sheet metal without removing material. "Bending" is a specific type of forming that creates an angle along a straight line, typically using a press brake. So, all bending is forming, but not all forming is bending.
Think of "forming" as the parent category. It includes a wide range of processes that change the geometry of a piece of sheet metal. This umbrella term covers everything from creating a simple angle to producing a complex car door panel.
Here are some examples to clarify:
- Bending: Using a press brake to create a 90-degree angle on a bracket. This is a very common type of forming.
- Stamping: Using a die to create features like ribs, louvers, or raised sections. This is also forming.
- Deep Drawing: Forming a flat sheet into a cup or box-like shape, like a kitchen sink. This is a more advanced type of forming.
- Hydroforming: Using fluid pressure to form complex curves. Again, this is a forming process.
So, when a customer sends me a drawing and asks for "forming," I often have to ask for more specifics. Do they need simple bends? Do they need stamped features? Understanding that bending is just one tool in the larger toolbox of sheet metal forming helps you communicate your design intent more clearly. It ensures we select the most efficient and cost-effective process for your specific part, whether it's a simple bent bracket or a complex stamped enclosure.
What is the process of hydroforming sheet metal forming?
You've heard that hydroforming can create amazing shapes, but the process sounds like magic. How does a liquid shape solid metal? Understanding the steps can help you see if it fits your project.
First, a sheet metal blank is placed onto the lower die. A pressurized chamber is sealed over it, and hydraulic fluid is pumped in at high pressure. This fluid forces the metal blank to wrap around and take the exact shape of the die below it.
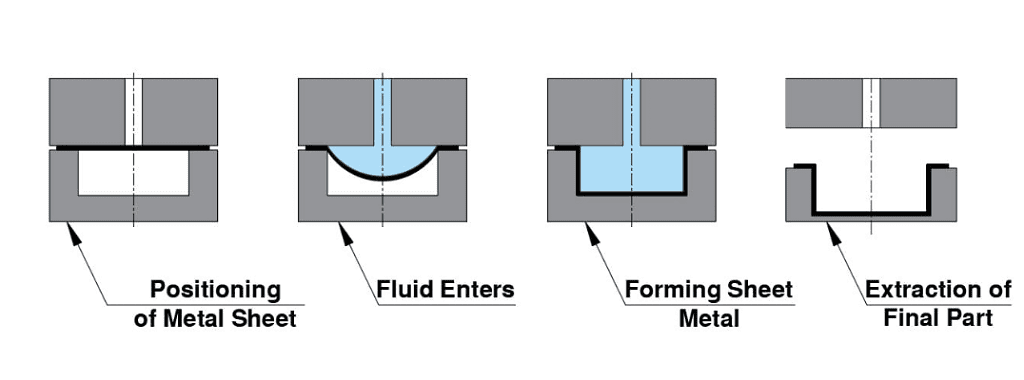
The hydroforming process is precise and powerful. Let's break it down into a clear, step-by-step sequence of what happens in our facility.
- Blank Placement: We start with a flat piece of sheet metal, called a blank, which has been cut to the rough size and shape needed. We carefully place this blank on top of the lower tool, which is the male or female die that contains the final shape of the part.
- Sealing the Chamber: The hydroforming press lowers a pressure dome or chamber over the blank and die, creating a sealed, water-tight cavity.
- Applying Pressure: High-pressure hydraulic fluid (usually an oil/water emulsion) is pumped into the sealed chamber. The pressure can reach thousands of PSI. This immense, evenly distributed pressure works like a flexible punch.
- Forming the Part: The fluid pressure forces the sheet metal blank downwards, wrapping it around the die. The metal flows and stretches into every detail of the tool, creating the desired shape with incredible accuracy.
- Releasing and Ejecting: Once the forming is complete, the pressure is released, and the fluid is pumped out. The press opens, and the perfectly formed part is removed.
This process allows for the creation of very complex geometries in a single step, often eliminating the need for later welding or assembly.
What are the advantages of bending sheet metal?
You're working on a prototype or a small batch of parts. You need a fast, affordable process without investing thousands in tooling. Is there a simple solution?
Bending is extremely cost-effective for low volumes because it requires no custom tooling. It offers very fast setup times, high flexibility for design changes, and is suitable for creating simple to moderately complex parts like brackets, enclosures, and chassis.
For many of our clients, especially those in hardware startups or running small production batches, press brake bending is the go-to solution. The benefits are clear and immediate, focusing on cost, speed, and flexibility.
- Zero Tooling Investment: This is the biggest advantage. Unlike stamping or hydroforming, we don't need to create a custom die for your part. We use a library of standard punches and dies that can be combined to create a huge variety of angles and features. This saves you thousands of dollars and weeks of waiting time right from the start.
- Unmatched Speed for Prototypes: I can have a part bent and ready for inspection within hours of receiving a final drawing. This rapid turnaround is crucial during the design and testing phase, allowing for quick iterations and design improvements without financial penalty.
- Design Flexibility: If you decide to change a flange length or an angle, it's often a simple matter of reprogramming the press brake. With stamping, a design change means re-making an expensive die. This makes bending the perfect partner for evolving product designs.
- Strong, Reliable Parts: Bending work-hardens the material along the bend line, which can add strength and rigidity to the final part, a desirable characteristic for structural components.
What are the problems with metal stamping?
You're considering stamping for a high-volume part, but the high upfront cost makes you nervous. Are there other hidden risks or limitations you should be aware of before committing?
The primary problem is the high initial cost and long lead time for die manufacturing. Once the die is made, design changes are very expensive. Stamping can also cause material thinning, stress fractures, or burrs if not designed and executed perfectly.
While stamping is the king of mass production, it's not without its challenges. It's my job to help clients like Mark understand these potential issues upfront so we can mitigate them.
Key Problem Areas in Metal Stamping
- Tooling cost and Lead Time: This is the most significant barrier. A complex progressive die can cost tens of thousands of dollars and take months to design, build, and test. This investment is only recouped over very large production volumes.
- Design Inflexibility: Once that die is hardened steel, it's set in stone. A small change to your product design could require a completely new, expensive die. This locks you into a design for the life of the tool.
- Material Integrity Issues:
- Thinning & Tearing: In deep-drawn parts, the material is stretched significantly. If the die isn't designed perfectly, the material can thin out too much in corners or even tear, leading to part failure.
- Springback: Metal has a memory. After being stamped, it tries to spring back to its original shape. We have to over-bend the part to compensate, which requires a lot of experience and precision.
- Burrs: The shearing and punching operations in stamping can leave sharp edges or burrs, which often require a secondary deburring process, adding time and cost.
Careful Part design, what we call Design for Manufacturability (DFM), is critical to avoid these problems. We work closely with our customers to analyze their designs before any steel is cut for the die.
What are the disadvantages of hydroforming?
Hydroforming sounds like an advanced, superior process. But is it always the best choice? You need to know the downsides before specifying it for your project to avoid unexpected costs or delays.
The main disadvantages are slower cycle times compared to traditional stamping, making it less suitable for extremely high-volume production. The equipment is also very expensive, which can be reflected in the part price. Finally, setup can be more complex than for a simple press brake operation.
Hydroforming is a powerful tool in our workshop, but it's not a magic bullet for every project. It's important to have a balanced view and understand its limitations.
- Slower Cycle Times: The process of sealing the chamber, pumping fluid to high pressure, forming the part, and then releasing the pressure takes longer than a mechanical stamping press, which can cycle multiple times per second. For a project requiring millions of identical parts per year, the speed of traditional stamping is often unbeatable.
- High Capital Investment: Hydroforming presses are technologically advanced and very expensive machines. This high initial cost for a fabricator means the operational cost per hour is also higher. While it can save money by reducing tooling or eliminating secondary operations, the base machine time can be more costly.
- Process Limitations: While excellent for complex, fluid shapes, hydroforming is not always the best choice for parts with very sharp, crisp internal corners. Stamping or bending can sometimes achieve tighter radii more efficiently. It's also primarily suited for single, open-sided parts rather than closed-box shapes.
We always evaluate whether the benefits of hydroforming—like part consolidation and superior material integrity—outweigh these disadvantages for a specific design.
What are the four types of metal stamping?
You know that stamping is used for high-volume production, but you've heard terms like "progressive die" and "transfer die." Understanding these different methods can help you grasp the costs and capabilities involved.
The four main types are progressive die, transfer die, four-slide, and single-station stamping. Progressive die is the most common for complex parts, performing multiple operations in one continuous process as a strip of metal feeds through the die.
Each type of stamping is suited for a different kind of part geometry and production volume. Here at Worthy, we select the method that offers the best balance of speed, cost, and precision for your project.
1. Progressive Die Stamping
This is the workhorse of high-volume stamping. A coil of metal is fed through a long die that contains multiple stations. At each station, a different operation (like punching, coining, bending) is performed. The part remains attached to the metal strip until the final station, where it is cut off. It's incredibly fast and efficient for producing complex parts in large quantities.
2. Transfer Die Stamping
This method is similar to progressive die, but the part is separated from the metal strip early on. Mechanical "fingers" transfer the individual part from one station to the next. This is useful for larger parts that can't be easily supported by a carrier strip, like deep-drawn shells or structural components.
3. Four-slide / Multi-slide Stamping
This method uses four or more moving slides to shape the part from different directions. It's excellent for creating complex parts with bends in multiple planes, like clips, springs, and other intricate hardware. It's a highly specialized process.
4. Single-Station Stamping
This is the simplest form. A single press stroke performs one operation, like blanking a shape out of a sheet or punching a hole. It often requires manual loading and unloading of parts, making it suitable for simpler jobs or lower production volumes where a full progressive die isn't justified.
What are the benefits of hydroforming?
Your part has a unique, non-symmetrical shape. You're worried about maintaining strength and hitting tight tolerances with other methods. Could hydroforming be the answer you're looking for?
The primary benefits are the ability to form highly complex and irregular shapes in one piece, excellent material distribution for uniform wall thickness, and a superior surface finish. It also increases part strength and can consolidate multiple smaller parts into one, saving on assembly costs.
When a client brings us a design that seems impossible to stamp, hydroforming is often the solution we recommend. Its unique approach unlocks several key advantages that other processes can't match.
- Unmatched Geometric Freedom: Because the forming pressure is applied by a fluid, it can push the metal into deep recesses and complex curves that a solid metal punch could never reach. This allows for organic, asymmetrical shapes that are both functional and aesthetic.
- Superior Part Quality and Strength: The uniform pressure ensures the sheet metal stretches evenly. This prevents the excessive thinning in corners that can plague deep-drawn stamped parts. The result is a part with consistent wall thickness, which translates directly to higher structural integrity and a better strength-to-weight ratio.
- Part Consolidation: This is a huge cost saver. A complex assembly that might have required five or six separate stamped parts to be welded together can often be made as a single, stronger piece through hydroforming. This eliminates tooling costs for the other parts and dramatically reduces assembly labor and time.
- Excellent Surface Finish: The side of the part that contacts the fluid has a very smooth finish, as it never touches a solid tool. This can reduce or eliminate the need for secondary polishing operations.
What are the different types of sheet metal forming process?
You're trying to get a grasp of the entire fabrication landscape. Bending and stamping are clear, but what other ways can sheet metal be shaped? Knowing the options broadens your design possibilities.
Beyond bending, stamping, and hydroforming, other key processes include deep drawing (for cans/sinks), roll forming (for long profiles like gutters), spinning (for cylindrical parts like cones), and embossing (for creating raised patterns or text).
Sheet metal is an incredibly versatile material, and we have many ways to shape it. While bending and stamping are the most common, understanding the wider field helps when you're designing a new product.
Here’s a quick overview of some key forming processes:
| Process | Description & Best Use Case |
|---|---|
| Bending | Creates straight-line bends using a press brake. Ideal for brackets, panels, and enclosures. |
| Stamping | Uses a die to quickly form features or cut shapes. Best for high-volume parts. |
| Deep Drawing | A specific type of stamping that forms a flat blank into a deep, boxy, or cup-like shape. Think kitchen sinks or fire extinguishers. |
| Hydroforming | Uses high-pressure fluid to form complex, flowing shapes with excellent strength. Great for automotive and aerospace. |
| Roll Forming | A continuous process where a coil of metal is passed through a series of rollers, each bending it slightly more until the final cross-section is achieved. Perfect for long parts with constant profiles, like C-channels or roofing panels. |
| Metal Spinning | A disc of metal is rotated at high speed and formed over a circular mandrel using a tool. Used to create conical and cylindrical parts like lighting reflectors and funnels. |
What is the process of bending sheet metal?
You have a design that requires several 90-degree flanges. How exactly does a flat sheet of metal get transformed into a precise 3D part? Understanding the bending process helps you design better parts.
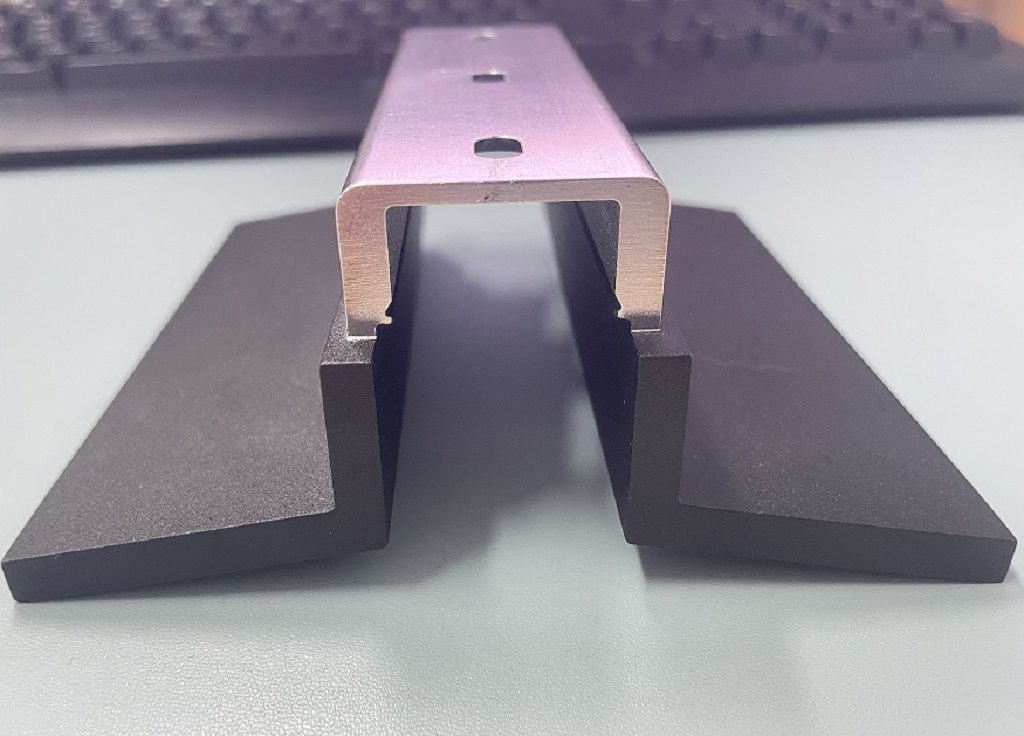
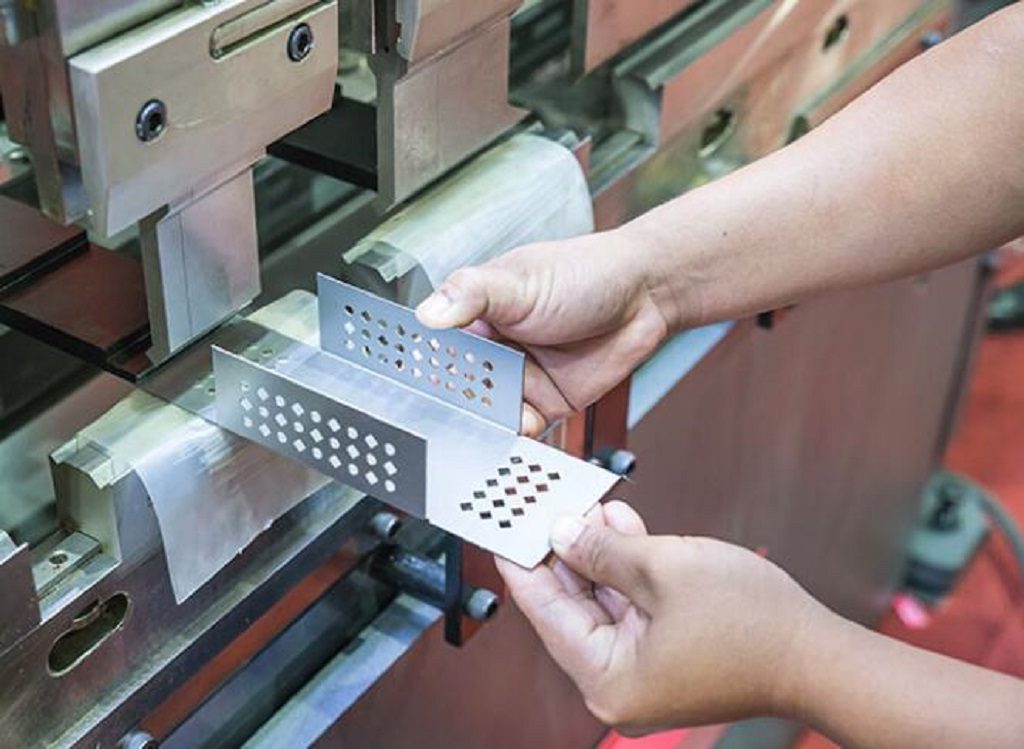
We use a machine called a press brake. A sheet of metal is placed between an upper tool (the punch) and a lower tool (the V-die). The punch descends with great force, pressing the metal into the V-die and creating a clean, precise bend along a straight line.
Press brake bending is a blend of power and precision. The process might seem simple, but achieving tight tolerances requires skilled operators and modern machinery. Here's a more detailed look at what happens.
- Programming: First, our engineer or operator takes your 3D model or 2D drawing. They input the bend angles, flange lengths, and material type into the CNC (Computer Numerical Control) controller of the press brake. The controller calculates the exact position of the back gauge (which positions the sheet) and the depth the punch needs to travel.
- Positioning: The operator places the flat sheet metal part against the back gauge. This ensures the bend happens in the exact right location, every single time.
- The Stroke: The operator initiates the cycle. The hydraulic ram drives the punch downward, forcing the sheet metal into the V-shaped opening of the die. The depth of the punch's penetration determines the final angle of the bend. This is often called "air bending," as the sheet doesn't fully touch the bottom of the die.
- Springback Compensation: After the punch retracts, the metal will naturally spring back a few degrees. Our modern CNC press brakes automatically calculate this springback and over-bend the part slightly, so it relaxes into the perfect target angle.
- Sequence: For parts with multiple bends, this process is repeated. The operator follows a specific bend sequence, carefully rotating and positioning the part for each subsequent bend to create the final 3D shape.
What are the two types of sheet metal?
When you're specifying material for your project, you see many options like "cold-rolled steel" or "5052 aluminum." Is there a simple way to categorize these to make the initial choice easier?
At a high level, sheet metals are broadly categorized into ferrous metals (which contain iron and are magnetic, like steel and stainless steel) and non-ferrous metals (which do not contain iron, like aluminum, copper, and brass). Your choice depends on strength, weight, corrosion resistance, and cost.
Choosing the right material is just as important as choosing the right forming process. The material's properties dictate how it will perform in its final application. Let's break down the two main families.
Ferrous Metals
These are alloys based on iron. They are known for their strength and durability.
- Steel (e.g., Cold Rolled, Hot Rolled): Strong, low-cost, and widely used. It's the default for many industrial applications but will rust if not protected by a finish like powder coating or plating.
- Stainless Steel (e.g., 304, 316): An alloy of steel with chromium and nickel. It offers excellent corrosion resistance, making it ideal for medical, food-grade, and outdoor applications. It's more expensive than plain steel.
- Alloy Steel: Steel mixed with other elements to enhance specific properties like hardness or heat resistance.
Non-Ferrous Metals
These metals do not have iron as their main component. They are generally more corrosion-resistant and non-magnetic.
- Aluminum (e.g., 5052, 6061): Lightweight, strong for its weight, and naturally corrosion-resistant. It's a top choice for aerospace, electronics, and consumer products where weight is a critical factor.
- Copper: Highly conductive (both electrically and thermally) and very corrosion-resistant. It's used for electrical components, bus bars, and roofing.
- Brass: An alloy of copper and zinc. It's known for its acoustic properties, low-friction applications, and decorative appearance.
We have experience working with all these materials and can advise you on the best choice based on your part's function and budget.
What are the three basic types of sheet metal processes?
To get a complete picture of fabrication, you need to understand the big steps. Beyond just shaping the metal, what are the fundamental operations that turn a raw sheet into a finished product?
The three basic types of sheet metal processes are Cutting, Forming, and Joining. Cutting creates the initial shape (e.g., laser cutting), Forming bends or stamps it into a 3D part (e.g., press brake), and Joining assembles it with other parts (e.g., welding).
Nearly every sheet metal part we make at Worthy goes through at least one, and often all three, of these fundamental stages. Understanding this workflow helps you visualize how your design becomes a reality.
1. Cutting
This is the first step. We take a large stock sheet of metal and cut out the flat pattern of your part. The goal is to get a precise 2D shape, known as a blank, that will later be formed.
- Methods: Laser cutting (for high precision), waterjet cutting (for thick materials or materials sensitive to heat), and punching/blanking (for high-volume, simple shapes).
2. Forming
This is where the 2D blank is transformed into a 3D object. This stage includes all the processes we've been discussing, where the metal's shape is changed without removing material.
- Methods: Bending, stamping, rolling, hydroforming, and deep drawing.
3. Joining
Many final products are assemblies of multiple sheet metal components. The joining stage brings them all together into a final, functional unit.
- Methods: Welding (TIG, MIG), riveting, using threaded fasteners like PEM nuts and studs, and applying adhesives.
A typical project flow: We laser cut the blank, bend it on the press brake, insert some PEM nuts, and then weld it to another component. Each stage is a critical piece of the puzzle.
What are the different types of hydroforming process?
You're interested in hydroforming, but you've seen references to both sheet and tube hydroforming. Are they the same thing, and which one is relevant for your flat-pattern-based parts?
There are two main types: sheet hydroforming and tube hydroforming. Sheet hydroforming, which we've been discussing, forms flat metal blanks into complex shells. Tube hydroforming expands a metal tube from the inside out into a die, creating complex hollow structural parts.
While both processes use the power of high-pressure fluid, their applications and starting materials are completely different. It's important to know which process is right for your needs.
Sheet Hydroforming
This is the process most relevant to parts that start as a flat sheet of metal.
- Process: A flat blank is pressed into a single-sided die by a pressurized bladder or cavity of fluid.
- Applications: Creating complex, single-sided panels and shells. Common examples include automotive body panels, fuel cell plates, and complex enclosures for electronics. This is the primary hydroforming service we offer at Worthy for sheet-based parts.
Tube Hydroforming
This process is used to form tubular or hollow parts.
- Process: A straight or pre-bent tube is placed inside a closed die. The ends of the tube are sealed, and it is filled with high-pressure fluid. The fluid pressure expands the tube outwards, forcing it to take the shape of the surrounding die cavity.
- Applications: Creating lightweight, strong, and complex hollow structural components. It's huge in the automotive industry for making a vehicle's frame rails, engine cradles, and roof pillars. It allows engineers to create one complex tube that replaces an assembly of many stamped and welded parts.
What is the difference between hydroforming and deep drawing?
Your part is a deep, cup-like shape. You've heard that both deep drawing and hydroforming can make it, but you don't know which is better. What's the key difference?
Deep drawing uses a solid metal punch to force a sheet metal blank into a die cavity. Hydroforming uses fluid pressure instead of a solid punch. This fluid pressure results in more uniform material thickness, making it better for complex, asymmetrical, or very deep parts.
Both of these are methods for creating deep, three-dimensional parts from a flat sheet, but their mechanics lead to very different outcomes. As a fabricator, choosing the right one is critical for part quality.
Deep Drawing
This is a more traditional stamping process. A round or rectangular blank is clamped over a die opening. A punch then moves down, pushing the metal through the die and forming it into a cup or box shape.
- Strengths: Very fast cycle times, great for high-volume production of simple symmetrical shapes like cans, pots, or ammunition casings.
- Weaknesses: The material is stretched over the punch radius, which can cause significant thinning at the corners and bottom of the part. This can be a weak point.
Hydroforming
As we've discussed, this process uses fluid to form the part against a single die half.
- Strengths: The uniform fluid pressure allows the material to flow more freely and maintain a much more consistent wall thickness, even in very deep or complex shapes. This produces a stronger, higher-quality part right out of the press.
- Weaknesses: The cycle time is slower than mechanical deep drawing.
For a simple aluminum can, deep drawing is perfect. For a complex, asymmetrical sink basin or a specialized aerospace component, the superior quality and uniform strength from hydroforming make it the clear winner.
Conclusion
Choosing between bending, stamping, or hydroforming depends on your part complexity, order volume, and budget. We help clients analyze designs to find the most effective method, ensuring your money is well-spent.