How To Troubleshoot Common Issues With Anodized Aluminum Parts?
Your anodized parts have flaws like color differences or white spots. This ruins their look and costs you money. But you can fix these common problems with a few simple steps.
To troubleshoot common issues with anodized aluminum like uneven color or white spots, you must focus on preparation. Make sure parts are perfectly clean before anodizing. Use good fixtures for solid electrical contact, and keep the tank's current and temperature consistent for a uniform finish.
When I talk to clients like Mark from Canada, quality is always the top priority. He can't afford to receive a batch of parts with inconsistent finishes. It delays his production and hurts his reputation. The good news is that most anodizing problems are preventable. They don't happen because of some big mystery. They happen because small, critical steps were missed. Getting these details right is the key to a perfect finish, every single time. It's about building a process you can trust. Let's look at some of the common questions and issues that come up.
What Is The 720 Rule For Anodizing?
Do you find anodizing formulas like the 720 rule confusing? This confusion can cause wrong coating thicknesses, wasting your time and materials. But this rule is simple to understand.
The 720 rule is a basic calculation to estimate the anodizing time needed for a specific coating thickness. It helps you figure out how many minutes to run the process at a certain current density to achieve your desired outcome, usually measured in mils.
The 720 rule is a great starting point for any anodizing job. It gives you a reliable baseline to work from. The formula is straightforward. You divide 720 by the amps per square foot (ASF) you are using. The result is the number of minutes it will take to build a coating that is one mil (0.001 inches) thick.
For example, if you are running your tank at 12 ASF, the calculation would look like this:
720 / 12 ASF = 60 minutes.
This means it will take about one hour to get a 1 mil thick anodized layer.
Here is a simple table to show how it works:
| Amps per Square Foot (ASF) | Calculation | Time for 1 Mil Thickness |
|---|---|---|
| 10 | 720 / 10 | 72 minutes |
| 12 | 720 / 12 | 60 minutes |
| 15 | 720 / 15 | 48 minutes |
But you have to remember this is a guideline. The exact time can change based on other things. The type of aluminum alloy, the temperature of the tank, and the specific chemicals you use can all affect the result. We always start with the 720 rule and then adjust based on our experience with a specific part or material to get perfect results.
What Is The Downside Of Anodized Aluminum?
Anodized aluminum looks great and is very durable. But are you aware of its hidden problems? Not knowing its limits can cause unexpected failures and add to your costs.
The main downsides of anodized aluminum are its brittle surface, which can crack under pressure, and the difficulty in matching colors between batches. It's also hard to repair if scratched, and the anodized layer makes it impossible to weld without removal.

While anodizing creates a hard, protective layer, that hardness comes with trade-offs. It's important to know these limits before you choose it for your parts. The first thing to consider is that the anodized layer is a ceramic. It's very hard, but it's also brittle. If you bend or impact the part with enough force, the coating can develop tiny cracks or even chip off. This is a critical factor for parts that will face a lot of stress or flexing.
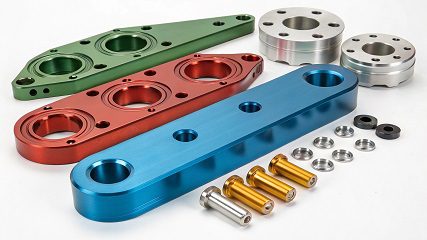
Another major challenge, especially for B2B customers who need consistency, is color matching. From my experience, getting the exact same shade of blue or red across different batches can be very difficult. Small changes in tank chemistry, temperature, or even the aluminum alloy can change the final color. We have strict process controls at Worthy to minimize this, but it's an inherent challenge of anodizing.
Here’s a breakdown of the key downsides:
| Downside | Description |
|---|---|
| Brittleness | The hard ceramic layer can crack or chip if the part is bent, dented, or impacted. |
| Color Variation | It is very difficult to achieve a 100% perfect color match from one production batch to the next. |
| Repair Difficulty | Scratches go through the colored layer to the bare aluminum underneath and cannot be simply polished out. |
| Poor Weldability | The anodized layer acts as an insulator and contaminant, preventing a clean, strong weld. |
How Do You Fix Anodized Aluminum?
When an anodized part gets a scratch or a flaw, it can feel like a total loss. Throwing these parts away is a waste of money and hurts your bottom line. But you can often fix them.
To fix flawed anodized aluminum, you must first chemically strip the old coating completely. After stripping, you fix the base metal, like polishing a scratch. Then, you can re-anodize the part, ensuring it is perfectly clean and has a good fixture connection.

You cannot spot-fix an anodized finish. If a part has a deep scratch, you can’t just sand it down and re-apply the color in that one area. The entire part needs to be reworked. The process starts with stripping. The part is submerged in a chemical bath that dissolves the aluminum oxide layer without damaging the aluminum underneath. Once the coating is gone, you have a bare aluminum part again.
Now, you can address the original problem. If there was a scratch, you can carefully sand and polish the area until it is smooth. If the issue was an uneven finish, the key is to prepare for a better second attempt. This is where I focus on the details I mentioned earlier. These steps are critical to avoid repeating the same mistake.
| Preparation Step | Why It's Important |
|---|---|
| Thorough Cleaning | Any oil, grease, or dirt left on the surface will prevent the anodizing process from working correctly, causing spots. |
| Secure Fixturing | The part must have a solid electrical connection. A loose clamp causes uneven current flow, leading to an uneven coat or white contact marks. |
| Tank Optimization | We make sure the current density is uniform across the entire tank. We also control the temperature very closely to ensure a consistent finish. |
By following these steps, we can successfully re-anodize parts and save them from the scrap bin. It turns a potential loss into a high-quality product for our customers.
Why Can't You Weld Anodized Metal?
Have you ever tried to weld an anodized aluminum part? It creates a weak, messy, and useless joint. This mistake can ruin your entire project and waste good material.
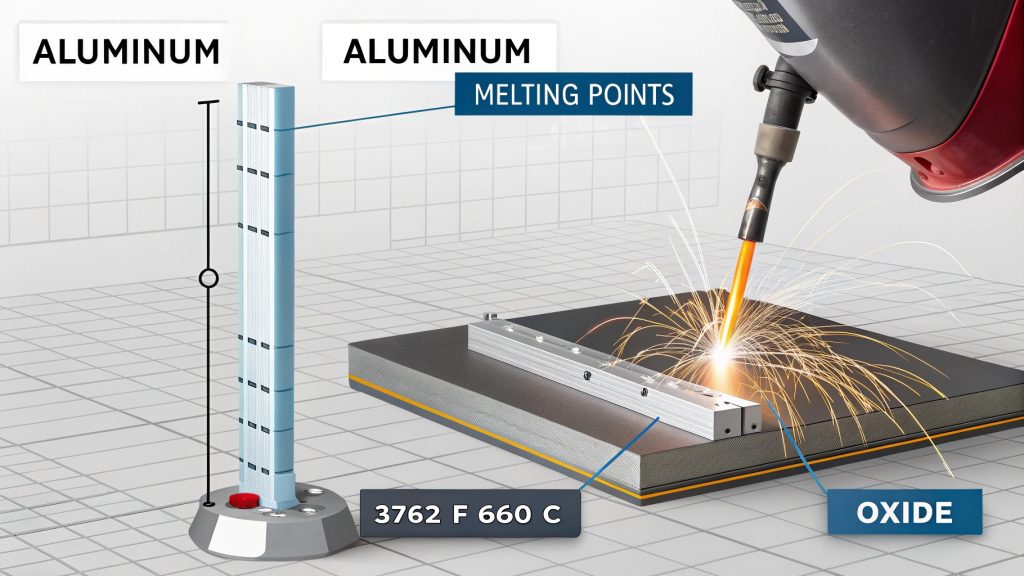
You can't weld anodized aluminum because the anodized layer has a much higher melting point than the aluminum itself. This ceramic oxide layer doesn't melt properly and contaminates the weld pool, resulting in a porous, brittle, and very weak weld.

The problem is a simple matter of physics. The base aluminum metal and the anodized layer on top of it are two very different materials. Think of it like trying to weld metal that is covered in a thin layer of glass. The anodized layer is aluminum oxide, which is a type of ceramic.
The difference in melting points is huge. The aluminum underneath will melt at around 1220°F (660°C). But the aluminum oxide layer on top won't melt until it reaches about 3762°F (2072°C). When you apply a welding torch, the aluminum base metal turns to liquid long before the coating does. The solid oxide layer then breaks up and falls into the molten aluminum. This contamination prevents the metal from flowing together and forming a strong bond. Instead, you get a weld full of impurities, porosity, and cracks.
| Material | Melting Point (Approximate) | What Happens During Welding |
|---|---|---|
| Aluminum | 1220°F / 660°C | Melts and becomes liquid, ready to form a weld pool. |
| Aluminum Oxide | 3762°F / 2072°C | Stays solid and flakes off, contaminating the weld pool. |
So, how do you weld a part that needs to be anodized? The solution is to do it in the right order. First, you weld the bare aluminum parts. After the welding and any necessary cleanup is complete, you then send the entire assembly to be anodized. If you must weld a part that is already anodized, you have to completely remove the anodized layer from the joint area by grinding or sanding before you start welding.
Conclusion
Fixing anodized aluminum is about good preparation and process control. Understanding the rules, knowing its limits, and learning how to correct errors will ensure you get high-quality, consistent parts every time.