How Does CNC Machining Process Affect The Final Anodizing Results?
Your anodized part looks blotchy and inconsistent. This is frustrating and costly. The problem often starts with the CNC machining itself, not the anodizing process. Let's fix this.
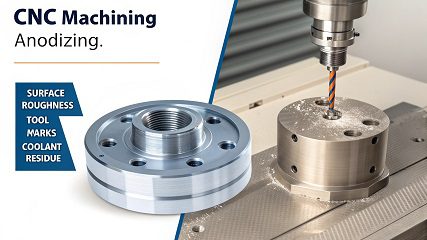
The CNC machining process greatly affects anodizing. Factors like surface roughness, tool marks, contaminants from coolants, and even the alloy choice dictate the final finish. A smooth, clean, and consistently machined surface is essential for a uniform and durable anodized layer.
The final anodized look depends heavily on the initial machining. Think of it like painting a wall; a smooth, clean surface gives the best result. Every cut and every tool path matters. In my years of running Worthy Hardware, I've seen countless cases where a client was unhappy with an anodized finish, and we traced the problem back to the initial machining parameters. To truly control the outcome, we need to understand the entire process. Let's break it down together.
What is CNC Anodizing?
You see "CNC anodized" on spec sheets, but what does it really mean? It's a crucial step for quality parts, not just a fancy term. Let's clarify it.
CNC anodizing isn't a single process. It refers to applying an anodized finish to a part previously created by CNC machining. Anodizing electrochemically grows a durable, corrosion-resistant oxide layer on a metal's surface, most commonly aluminum. The CNC precision creates the shape; anodizing protects and colors it.
When we talk about "CNC anodizing," we're really talking about a two-stage journey for a part. First, the CNC machine does the heavy lifting. It takes a solid block of metal, usually aluminum, and carves it into a precise shape based on a digital design. This is where we control the dimensions, the features, and critically, the surface finish. Once the part is perfectly machined, it moves to the second stage: anodizing.
Here, the part is submerged in an acid electrolyte bath and an electric current is passed through it. This process doesn't add a layer on top of the metal like paint. Instead, it converts the surface of the metal itself into a hard, durable, and non-conductive aluminum oxide layer. This layer is integrated with the part. This is why my main point is so important: the initial machined surface quality dictates the anodizing quality. Any tiny scratch or rough spot from the CNC machine will be "locked in" and often magnified by the anodizing process. We can't hide machining flaws with anodizing; we can only reveal them.
| Feature | CNC Machining Provides | Anodizing Provides |
|---|---|---|
| Shape | Creates the precise geometry and dimensions. | Does not change the shape, but adds thickness. |
| Surface | Determines the initial texture and smoothness. | Enhances and protects the surface texture. |
| Function | Mechanical strength and form. | Corrosion resistance, hardness, and color. |
What is the 720 Rule for Anodizing?
Trying to predict anodizing thickness and time feels like a guessing game. Getting it wrong ruins parts and wastes money. The 720 Rule is the simple formula engineers use.
*The 720 Rule is a formula used in anodizing to estimate the time needed to achieve a desired oxide film thickness. The formula is: Time (minutes) = (Desired Thickness (mils) 720) / Current Density (amps per square foot, ASF). It's a fundamental guideline for controlling the process.**

The 720 Rule is a cornerstone for any anodizing shop, including ours at Worthy Hardware. Let's break down how it works. It connects three key variables: the thickness you want, the electrical current you use, and how long you need to run the process.
The basic formula is:
Time (minutes) = (Desired Thickness in mils * 720) / Current Density (ASF)
-
Desired Thickness: This is how thick you want the protective oxide layer to be. It's usually measured in mils (1 mil = 0.001 inches or 25.4 microns).
-
Current Density: This is the amount of electrical current applied per square foot of the part's surface. It's measured in Amps per Square Foot (ASF).
-
The 720 Constant: This is a derived number that works for sulfuric acid anodizing (Type II) on many aluminum alloys under typical conditions.
For example, if a customer like Mark from Canada needs a 0.7 mil thick coating and we run our line at 15 ASF, the calculation would be: (0.7 * 720) / 15 = 33.6 minutes. This rule gives us a reliable starting point. However, it's not foolproof. Different aluminum alloys (like 6061 vs. 7075) anodize at slightly different rates. The temperature and concentration of the acid bath also play a big role. We use this rule as a guide but rely on our experience and process controls to hit the exact specifications every time.
What is the Anodizing Finishing Process?
So your part is machined. What's next? The anodizing process isn't just one step. Skipping or rushing any stage can lead to a poor-quality finish. Let's review it.
The anodizing process involves several key steps. First, the part is thoroughly cleaned and de-greased. Then, it's etched to create a matte finish. Anodizing happens in an electrolytic bath. After that, it can be colored with dyes. Finally, the part is sealed to close the pores.

The anodizing process is a carefully controlled sequence. At my facility, we treat it with the same precision as our CNC machining. Here’s a look at the typical journey a part takes after it leaves the mill:
-
Cleaning & Degreasing: The part must be perfectly clean. Any leftover cutting fluid, grease, or even fingerprints from handling will cause major defects in the final finish. The anodizing process can't penetrate these contaminants, leaving bare or discolored spots. This is why our post-machining cleaning protocol is so strict.
-
Etching (or De-smutting): The part is dipped in a solution, often caustic soda, to remove a very thin layer of aluminum. This removes the natural oxide layer and creates a uniform, often matte, surface finish. This step can hide very fine tool marks, but it cannot fix deep scratches or a generally rough surface from poor machining.
-
Anodizing: This is the main event. The part becomes the anode in an electrical circuit inside an acid bath. This grows the structured, porous oxide layer that is key to the whole process.
-
Coloring (Optional): If a color is needed, the part is submerged in a dye tank. The porous oxide layer absorbs the dye like a sponge. The depth and richness of the color depend on the quality and consistency of this porous layer, which goes back to the initial machined surface.
-
Sealing: This is the final, crucial step. The part is treated with hot water or other chemicals to close the pores of the oxide layer. This locks in the color and provides maximum corrosion resistance. An unsealed part will stain easily and won't be as durable.
Does Anodizing Change Mechanical Properties?
You chose anodizing for its looks and corrosion resistance. But does it make your part weaker? It's a critical question for any functional component. Let's find out the answer.
Yes, anodizing does change some mechanical properties, but mainly on the surface. It significantly increases surface hardness and wear resistance. However, hard anodizing (Type III) can slightly reduce the fatigue strength of the base material. The core tensile strength of the part remains largely unchanged.

This is a question I get a lot from engineers, who are always concerned with performance. The answer is yes, but it's a trade-off you need to understand. Anodizing creates an aluminum oxide (ceramic) layer, which is very different from the aluminum underneath. Here’s how the properties shift, and it's something every designer should be aware of.
| Property | Effect of Anodizing | Why it Happens |
|---|---|---|
| Surface Hardness | Dramatically Increased | The oxide layer is a hard ceramic, much harder than bare aluminum. |
| Wear Resistance | Significantly Improved | The hard surface resists abrasion and friction very well. |
| Corrosion Resistance | Greatly Enhanced | The sealed oxide layer is chemically stable and non-reactive. |
| Fatigue Strength | Can be Reduced | This is the most important consideration. |
The hard, brittle anodized layer can develop micro-cracks under repeated stress. These cracks can then propagate into the softer aluminum substrate underneath, leading to fatigue failure sooner than in a non-anodized part. This effect is more pronounced with thicker Type III (hardcoat) anodizing. For parts under high cyclic loads, this reduction in fatigue strength must be factored into the design. For most applications, the benefit of extreme surface hardness outweighs this slight reduction in fatigue life.
Conclusion
Achieving a perfect anodized finish starts with precise CNC machining. Control the surface quality from the beginning, and you will get the beautiful, durable results you expect every time.